Showing posts with label frugality. Show all posts

Monday, October 17, 2011

Homecoming at Home

I have been completely missing in action the last week or so, because I agreed to do a very daring thing.  I guess Brendan isn't the only brave one in our family, after all.

He was going to his first Homecoming dance on Saturday, after asking in a dramatic way a few weeks ago.  My husband and I encouraged him to have a few of his friends and their dates come to our house for dinner instead of going to a restaurant.  We figured that the food would be better, it would be cheaper, and it would be fun for our family to work together to prepare and present this kind of evening.  We told him that 8-10 people would be a perfect number.

When a bunch of his friends got word of the event, they wanted in.  As in, at the final tally, we served 35 teenagers dinner.  Yikes!


We accommodated everyone by pushing all our furniture in our family room to the sides and bringing in tables and chairs conveniently stolen borrowed from our church (we did give them back, I promise).  Two other moms who are a-maz-ing cooks (amazing to the point that I have to really try to not feel completely jealous/insecure around them in the kitchen) did the majority of the cooking.  I made a bunch of decorations earlier in the week, and then I (with help from my mom and another nice mom who volunteered at the last minute) decorated and hosted.  My husband hauled tables and chairs like a maniac, vacuumed and held down the fort with the younger kids and their soccer games that afternoon while I worked feverishly all day to prepare.  The younger kids all pitched in, too, working like house elves.  Literally, see?


Hey, even House Elves need a break.  S.P.E.W., unite :) !

House elves, because their Homecoming had a Harry Potter theme.

Is that not the coolest Homecoming Week theme ever!!?!  

Anyway, in homage of Harry Potter, we served the guests butterbeer as they were arriving and taking pictures.  It was pretty good, by the way.  Fairly close to the stuff we drank at Harry Potter World last February.

About a half-hour before we were due to start, I was worriedly mulling over what a fool I am for taking on projects like this when I seem to have enough to do just keeping clean underwear in people's drawers.

But half-way through the evening, I got one of those happy, "this was worth the sacrifice" kind of satisfying feelings.  Having 35 teenagers in our home was a delight, our carpet remained unscathed despite serving sparkling grape juice (don't quite know why I approved that idea :) ) and I think it'll be something they will all remember for a long, long time.


Anybody else bitten off more than you can chew lately, but loved every minute of it like I did :)?  

Monday, October 3, 2011

Kitchen Improvement #1: Craigslisted West Elm Island

Remember my post about my kitchen and my hopes for making it a little happier and more awesome?

I've been taking some baby steps, starting with purchasing this West Elm island from someone off Craigslist.  It originally listed for $1,400 retail, and I scored it for only $350 despite because of my killer bargaining skills.


Seriously, my attempt at bargaining was pitiful.  I asked the seller, "Would you consider taking more?"  He paused a moment, as both of us considered my novel approach to haggling, and said, "Sure, I'd take more."  I started laughing, and so did he.  I confessed that my confused question demonstrated the full extent of my bargaining skills.  He offered to take $50 off the price.  I blushingly agreed.  Embarrassing.


Embarrassing moments aside, it is a really pretty piece, and it nicely stores all my baking stuff, as well as providing a little space for displaying some fun things.

This recipe book, "Joys of Jello" was my husband's Grandmother's from the 1960's.  There are all sorts of scary recipes in there!  But it helps me stay true to my time in Utah.  Go green jello!

A few of my favorite aprons.

Clock from IKEA.

Here's a closer view of the shelves underneath, with my favorite pretty cookbooks (my cookbook folders are in the right-hand cupboard), some tea towels I use to line bread baskets and cover rising dough with, vintage rolling pins and a pitcher in my favorite blue.

It's a happy spot in my kitchen visually, and has helped things function better, too.  That's fundamentals and fripperies in a nutshell, right there :).

Have any of you found something lately that improves your kitchen's form and function?  I'd love to hear about it.


Linking up to: Not Just a Housewife and Miss Mustard Seed: Furniture Feature Friday

Wednesday, May 4, 2011

Pillowcase Apron

Are you ready for this?  Easiest, cutest aprons ever!


 I'm really not naturally crafty, but my sweet mom did teach me to sew.  If you are like me and have done a fair amount of sewing, a project like this is a snap.  However, it is totally doable even if you are a novice.

I got the idea from Betz White's blog.  I followed her directions fairly closely, but I customized the apron length depending on the wearer and the length of the pillowcase.  Her directions make an apron that is a tad short for my taste when you are using a standard size pillowcase and sewing for an adult--it is more of a toolbelt style apron.  More on this below.

Here are some pictures of the two I made initially.  They are really cute on, no matter whether you are are a lithe and cute 8-year-old, or a 30-something-year-old with a little more fluff under your pillowcase, if you know what I mean...


Here is what you need:
  • 1 pillowcase
  • Grossgrain ribbon--approximately 2 yards of 3/4 to 11/2 inch wide grossgrain ribbon (normal, not the wired/decorator type)
  • Thread--match the ribbon or the pillowcase or both?? your call...

I sewed three more aprons after these initial two as birthday gifts for some of my "London" friends.  They are a great group of girls who I met while all our husbands were working on a project in London, England.  We started a book group over there, and have been meeting regularly ever since (until I moved to Washington, that is...sigh).  So ladies, if you are reading this, try to act surprised, 'k?

A note on cost--these aprons are averaging maybe $3 each.  I got the pillowcases because they were adorable, affordable ($1 a piece) and brand-new at the Goodwill.  If you used pillowcases from Target or wherever, that would obviously drive up the cost.  And as for this ribbon, the patterned ones came from Jo-Ann's ($3.99 a spool, and I didn't use all of it).  The solid ribbons come from spools of ribbon I got about five years ago that were $1 for 500 yards.

Yes--one doll-ah.

At the risk of making this the tutorial with the longest introduction ever, I must digress and eulogize the old dollar store in Sandy, UT.  Before it became a Dollar Tree, it was a Greenbacks All-A-Dollar.  Greenbacks would sometimes get some completely awesome stuff (like 500 yards of real grossgrain  and satin ribbon for a dollar).  I bought about $10 worth.  In retrospect, I should have bought a whole carful--but I am enjoying the colors I did buy while they last.

My bargain ribbon and pillowcases.

1.  So, you get your pillowcase and fold it in half length-wise (pic 1).
Pic. 1.  Please ignore the fact that I've already pinned other stuff on this apron.  I forgot to take the picture :).

2.  Fold your ribbon in half (pic 2), line up your centers (pic 3) and pin your ribbon on the top, unhemmed edge (the "bottom" of the pillowcase--see pic. 3).

Pic. 2

Pic. 3
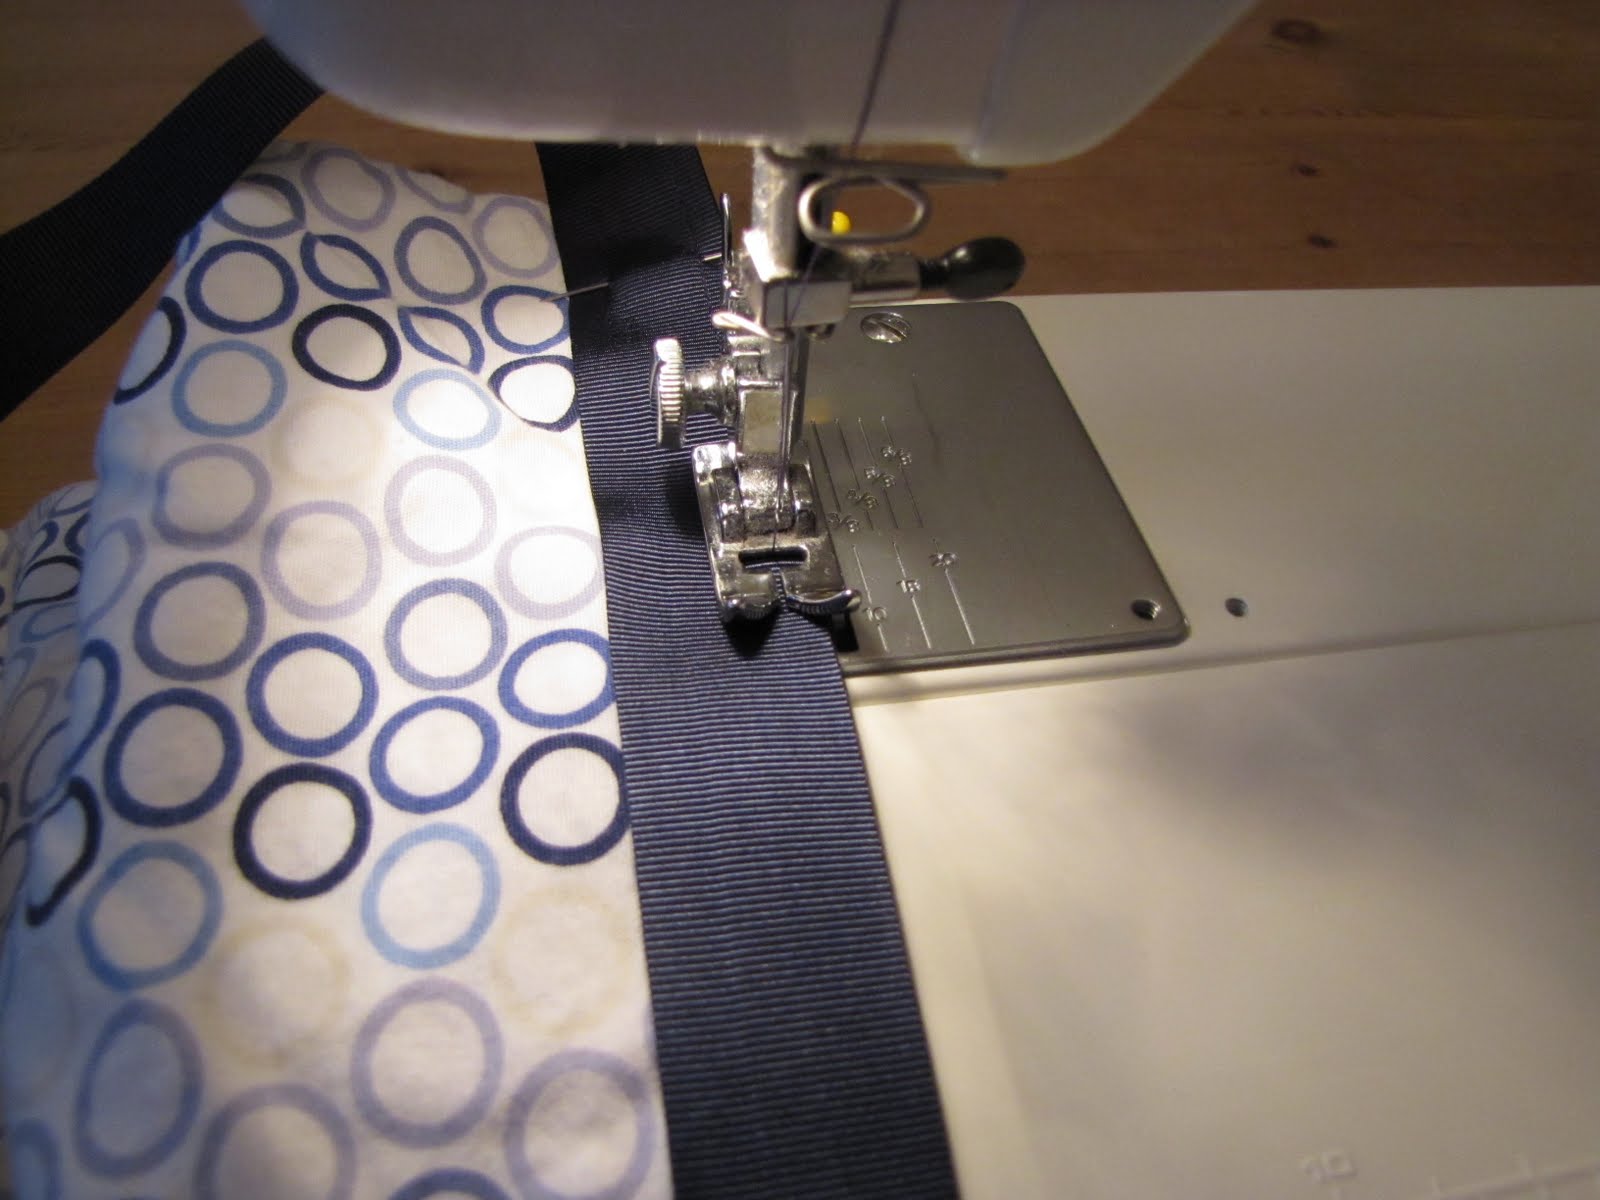
3.  Sew your ribbon across the top edge, down the side, across the bottom edge of the ribbon and up the other side--like a long, skinny rectangle (pics 4-7).

Pic. 4
Pic. 5
Pic. 6
Pic. 7a


Or, you can do a wide zig-zag down the middle of the ribbon--just make sure to go forward/reverse a couple times at each end to ensure it will be durable.

4.  Now, if you have a long, king sized pillowcase, or if you have a standard-sized pillowcase but like your apron short (or if you are making this for a child): fold the bottom/hemmed edge up 8"-9" and hem the fold 1/4" from the edge.


Pic. 8

Pic. 9.  Hemming folded edge 1/4 inch from edge.

5.  Then fold apron over again (about 8"-9")--see Pic. 10 of what the folded apron looks like from the side.  Pin the sides.  Sew 1/4" from each side, then sew down the middle (for a divided pocket)--see Pic. 11, then sew 1/4" from the bottom fold/hem.  Look at the finished aprons at the top if you need a visual in terms of where the edges need to be sewn.


Pic. 10. View of folded apron from the side.

Pic. 11.  Center pocket pinned and being sewed.
Adaptation for standard-sized pillowcases: If you have a standard-sized pillowcase and want it to be a little longer, fold the bottom/hemmed edge up only 4-5 inches or so--maybe just an inch or so past the hem.  In Pic. 12 below, I hemmed it up 5 inches.  Hem the fold 1/4" from the edge, and proceed as described above in step 5 (fold up 8" for the outside pocket).


In either case, if you have a cute design detail at the band of the pillowcase, you can be strategic about where you fold it, or you could even fold it so the pillowcase's hem shows.

Clip your threads if you haven't already done so, and you are done.

Oh yeah!

Since this goes so quickly, you have time left over to embellish.  I will post about what I did with these three aprons in the next few weeks/after I move.

But in the meantime, I need to get these to the post office for my friends, and who am I kidding--take a shower and keep packing :).  Later!

I'm linking up to:                                   Not Just a Housewife's Show me What Ya Got       and

Weekend Bloggy Reading


Sunday, April 10, 2011

Springy Mantel: High-end style on low-end budget

 I put together a quick Springtime mantel on Friday night.  My husband went on a church camp-out with the oldest three boys and my oldest daughter was having a sleepover with a friend, so my three-year-old and 9-month-old*helped* me.  It's not perfect, but I didn't have to buy anything to create it, so as far as I'm concerned, that is good enough.

Everything was purchased at either the dollar store or thrift stores. Hopefully it looks classier than that :).  And sorry about the lighting--even in broad daylight, the living room in the home we are renting is the worst lit room ev-ah.
Dollar store lamb, $1 thrift store brass framed mirror, dollar store frame painted blue (a'la Melissa from 320 Sycamore) with quote I printed myself.
Dollar store moss, eggs bought from an online florist shop for cheap (like $1.50 for 12 kind of cheap) in a shabby $2 thrift store urn.
More eggs and moss in a $1 glass hurricane from the Dollar store.
Close up of the apothecary jar (not from a thrift store or dollar store, but it was a present, so it was free!).  The nest and the blue fragment of egg in the front are real.  A few years ago, a cheeky bird used all the lemon thyme from my herb garden to build a nest.  One day, the happy little bush was there, and a few days later, every strand was gone.  I didn't know what happened until a windy summer day brought this nest down with the sweetest little fragment of a robin's egg inside.  There is nothing like that color.

So there you go.  It may not win any design awards, but it makes me smile, and that's what matters :).

I'm linking up at: Centsational Girl

and


Monday, March 28, 2011

New-to-Us Sofas AND Craigslist Furniture Buying Tips

I have been meaning to post pics of our new-to-us sofas forever.

That is almost as long as it took for me to make a decision about what to buy.  I went around to all the furniture stores in the area, and got thoroughly depressed by the cost vs. attractiveness of what I saw. I don't have anything inherently against spending money for furniture, but I want to really like it if I am going to pay more than I spent for a year's worth of college tuition on a couple of sofas.  It wasn't helping that I had a pretty narrow idea of what I wanted: a formal sofa with turned legs for the living room, and a big, squishy, slip covered sofa for our family room.  Both these styles are more commonly found in higher-end establishments.  As usual, I wanted a high-end look on a low-end budget.
I was trying to replace our family room sofa 

and our living room sofa.  

Both had seen better days--the living room sofa was a $30 thrift store find covered by a $30 steal of a slipcover, and the family room sofa was a bicast leather sofa that had cracked, then been picked at by my sweet but mildly destructive children until it looked like this:
 {{Shudder}}.  Not pretty.


After combing all the furniture stores, I finally decided I do not have the fiscal stomach for buying new furniture.  So I started looking on Craigslist seriously, and within a couple weeks I had found two sofas.  Both were in great shape, and were really close to the ideal sofas I had in my head.

Here is my new living room sofa (boy and plastic golf ball shown to give you an idea of the scale of the pieces ;) ): 


 It is an Ethan Allan sofa--currently on their website for about $2,000.  I got it for $100.  The woman who sold it had a black lab who liked to sit on it, and she was sick of trying to remove black pet hair from a white sofa.  I think I will eventually make slipcovers for it (and maybe stain the turned legs which are a little light for my taste), but in the meantime, I washed all the cushion covers and down cushion wraps in hot, vacuumed it thoroughly and sprayed the heck out of it with Lysol.  I think it looks great in my living room.

Now for the family room sofa:
This is a Crate and Barrel down-filled slip covered sofa that has been discontinued on their website.  From the looks of things, it would have been between $1500 and $2500 new.  I bought it for $250.  The lighting in this picture is terrible, but the fabric is a sage-ish green chenille.  It is great because it is long enough that four people (five if they are little people) can sit on the sofa at the same time.  This one was in awesome shape.  I vacuumed and Lysol-ed it and it was ready to rumble.

There are some things I've learned over my years of buying furniture off Craigslist and the like that really make the process go more smoothly.  I'm sure most of you die-hard Craigslisters have lots of wisdom to share, but for what they're worth, here are my tips:

  • Measure your space--doors, space for the wanted piece, etc.  There are not usually returns when you buy something from someone on Craigslist.
  • Ask as many questions up front as possible.  Once you've driven to some one's house, you tend to be very invested in buying the piece.  You may have reservations once you see it, but feel pressured to get it anyway, if only to justify your time expenditure.  The more you know ahead of time, the fewer surprises.  Some examples of things to find out are: Smoking household? How old?  Any defects? Who was it made by?  Why are they selling it?
  • Make sure to be courteous to the seller.  Even when you are grilling them about their item, be tactful and kind, i.e. "Could I ask you a few questions about the piece you are selling?"
  • Do your research.  Look up the manufacturer of the piece you are considering.  Does it have a good reputation?  I eliminated several sofa options this way.  Of course if the price is low enough, you may be willing to take a chance--but it is better to know what you are getting up front.
  • Take a buddy with you when you go to see the item, both for safety's sake and to help you stuff your item in your vehicle.  Also bring directions or a GPS, the seller's phone number, a tape measure/your house measurements and some rope (to tie down your trunk or hatch just in case).
  • Plan on paying in cash.  If it is a large sum, I often check out the piece and the situation first to make sure I'm interested before I go get the money from my ATM.  Usually, if it is under $100, I'll just bring the money with me.
So what about everybody else?  Do you have any tips to make Craigslisting easier?  Or have you scored a furniture steal lately?  Inquiring minds want to know... :)


I'm linking up with: